在 Windows Server 上配置软件 RAID
原英文标题:Windows Server Software RAID 最后修改于 2021-05-09 • 创建于 2020-03-18 • ID: RO-8FB01
1. 介绍
本指南介绍如何在 Windows 操作系统中手动设置磁盘镜像(RAID1)。
通过我们的自动 Windows 安装(可通过 Robot 获取)安装的服务器,或订购了 Windows 附加组件的服务器,已经配置并运行了 RAID 1。因此,本指南仅适用于自定义 Windows 安装。
2. 准备
-
首先,请点击左下角的 Windows 图标,或按 Windows 或 Super 键。
-
输入
diskmgmt.msc并按回车键打开磁盘管理工具。以下是该工具的简要概览:
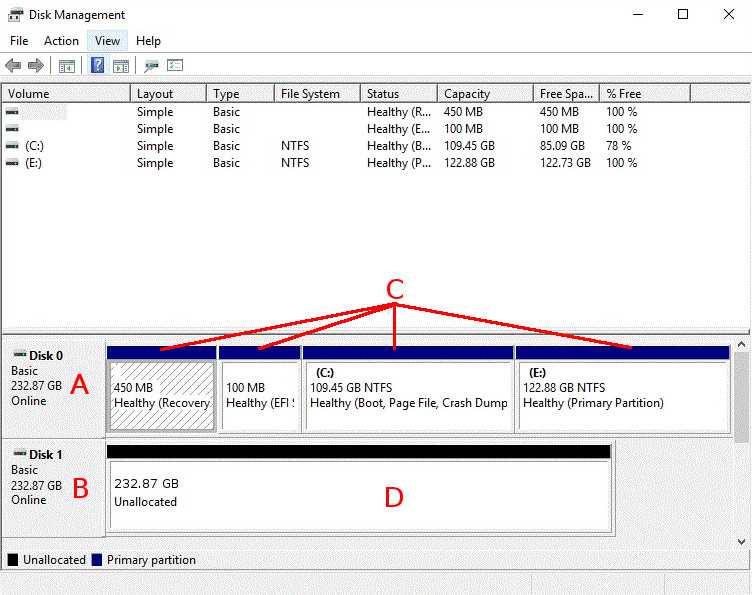
- A: 主磁盘,包含操作系统 - B: 第二块磁盘,用于 RAID1 镜像 - C: 主磁盘上的卷(在 Windows 中即分区) - D: 第二块磁盘上的未分配空间 3. 如果第二块磁盘上已有卷,请右键点击它们并选择“删除卷”。
-
右键点击当前包含操作系统的磁盘,然后点击“转换为动态磁盘”。
-
在随后出现的对话框中,主驱动器应该已经被选中。请同时选择要用于 RAID1 的另一块驱动器。点击“确定”并确认。
-
现在需要确定系统是以 Legacy 模式还是 UEFI 模式安装的。为此,请点击左下角的 Windows 图标,或按 Windows 或 Super 键。
-
输入
msinfo32.exe并按回车键打开系统信息窗口。 -
在窗口右侧,你应该能看到
BIOS MODE条目,其值即为正确的模式(Legacy或UEFI)。如果找不到该条目,则系统是以Legacy模式安装的。现在,根据情况继续阅读下方的“Legacy”或“UEFI”部分。
3. Legacy
如果系统以 Legacy 模式运行,应该对主磁盘上的所有卷执行以下步骤。从左到右依次处理卷:
-
右键点击某个卷,然后从上下文菜单中选择“添加镜像”。
-
在出现的菜单中,选择要用于 RAID1 的第二块驱动器。然后点击“添加镜像”确认。
请确认已将所有卷正确添加到镜像中。同时检查同步是否正在运行,这可以通过卷的红色状态及其状态信息来判断。
4. UEFI
每个 UEFI 系统都有一个 UEFI 系统卷。Windows 无法自动镜像此分区;你需要手动将其复制并配置到第二块驱动器上。与 Legacy 模式一样,从左到右依次逐个为卷添加镜像。
- 对于所有没有
EFI标签的卷,请执行以下步骤:1. 右键点击某个卷,然后从上下文菜单中选择“添加镜像”。
2. 在出现的菜单中,选择要用于 RAID1 的第二块驱动器。然后点击“添加镜像”确认。
- 对于 UEFI 系统卷,请使用以下步骤:
1. 在第二块驱动器上创建一个相同大小的 UEFI 系统卷,并将其格式化为 FAT32。为此,只需右键点击第二块驱动器的未分配空间,选择“新建简单卷”,然后按照对话框操作。
2. 将 UEFI 系统卷的数据从第一块驱动器复制到第二块。为此,建议将服务器启动到 Rescue System,并通过 SSH 连接:
 1
 2
 3
 4
 5
 6
 7
 8
 9
10
11
12
13
14
15
16
17
18
19
20
21
22
23
24
25
26
27
28
29
30
31
32
33
34
35
36
37
38
39
40
41
42
43
44
45
46
47
48
49
50
51
52
  -   定位正确的分区:

      此命令会列出所有驱动器的分区。请在其中查找两块驱动器上的两个 UEFI 分区,可以根据它们的大小和文件系统([FAT32](https://en.wikipedia.org/wiki/File_Allocation_Table))来识别,并将磁盘标识符(0)与正确的分区编号组合。

      _示例:_

      ```
      parted -l
      Model: WD Enterprise P20691
      Disk /dev/sda: 2000GB
      Sector size (logical/physical): 512B/512B
      Partition Table: msdos
      Disk Flags:

      Number  Start   End     Size    Type     File system  Flags
       1      1049kB  101MB   100MB   primary  fat32
       2      102MB   2000GB  1999GB  primary  ntfs

      Model: WD Enterprise P20691
      Disk /dev/sda: 2000GB
      Sector size (logical/physical): 512B/512B
      Partition Table: msdos
      Disk Flags:

      Number  Start   End     Size    Type     File system  Flags
       1      1049kB  101MB   100MB   primary  fat32
       2      102MB   2000GB  1999GB  primary  ntfs
      ```

      在本例中,分区为 `/dev/sda1` 和 `/dev/sdb1`。

  -   创建挂载点文件夹:

      ```
      mkdir /mnt/main
      mkdir /mnt/second
      ```

  -   挂载正确的 UEFI 系统分区。(将分区替换为你找到的分区):

      ```
      mount -t vfat /dev/sda1 /mnt/main -o rw,umask=0000
      mount -t vfat /dev/sdb1 /mnt/second -o rw,umask=0000
      ```

  -   接下来,将当前 UEFI 系统分区中的所有文件复制到新的分区:

      ```
      cp -ar /mnt/main/ /mnt/second/
      ```

  -   完成后,将服务器重新启动回已安装的系统:
重要提示:UEFI 系统分区无法被镜像。因此,如果你更换驱动器或修改引导加载程序配置,上述过程始终是必需的。
请确保已将所有其他卷添加到镜像中。同时检查同步是否正在运行,这可以通过卷的红色状态及其状态信息来判断。
如果某些卷遇到问题,或者第二个 Plex(镜像 Microsoft 卷的一部分)无法启动,请参阅官方文档。
1. References
文档时效性说明
本文为早期笔记,可能存在版本过时、命令失效、链接失效、最佳实践变化等问题。请以官方最新文档为准。
https://docs.hetzner.com/robot/dedicated-server/raid/windows-server-software-raid/
1.1 原文(English)
tags: - Windows
Last change on 2021-05-09 • Created on 2020-03-18 • ID: RO-8FB01
1.2 Introduction
The following guide describes how to manually setup a drive mirroring (RAID1) in a Windows operating system.
Servers which have been installed using our automatic Windows installation (available via Robot), or ordered with the Windows addon, already have a RAID level 1 configured and running on them. So this guide is just intended for custom Windows installations.
1.3 Preparation
-
First, please click on the
Windows symbolin the bottom left corner, or press theWindowsorSuperkey. -
Type
diskmgmt.mscand press theEnterkey to open the Disk Management Utility.Please find a quick overview of the utility below:
- A: Main disk, which contains the operating system - B: Second disk, intended to be used for the RAID1 mirroring - C: Volumes (means partitions under Windows) on the main disk - D: Unallocated space on the second disk 3. If your second disk already has Volumes on it, please right-click on them and choose
Delete Volumeon all of them. -
Right-click on the disk which currently contains the operating system and click on
Convert to dynamic disk. -
In the dialog that then appears, the main drive should already be selected. Please also select the other drive which you would like to use for the RAID1. Click on
Okand confirm. -
Now you have to determine if your system has been installed in Legacy Mode, or in UEFI Mode. To do this, please click on the
Windows symbolin the bottom left corner, or press theWindowsorSuperkey. -
Type
msinfo32.exeand press theEnterkey to open the System Information window. -
In the right side of the window, you should see the
BIOS MODEentry, which has the correct mode (LegacyorUEFI) as its value. If you cannot find this entry, the system is installed in theLegacymode. Now, continue below to either "Legacy" or "UEFI".
1.4 Legacy
If your system is running in Legacy mode, you should do the following steps on all the Volumes of the main disk. Work on the Volumes from left to right:
-
Right-click on a Volume and choose
Add mirroringfrom the context menu. -
In the menu that appears, choose the second drive you would like for the RAID1. Then confirm by clicking on
Add mirroring.
Please check that you have correctly added all the Volumes to the mirroring. Also check that the synchronization is running, which is indicated by the reddish colored Volumes and their status information.
1.5 UEFI
Every UEFI system has a UEFI System Volume. This partition cannot be mirrored automatically by Windows; you need to manually copy and configure it on the second drive. Like with Legacy, add the mirroring for the Volumes one by one, from left to right.
- For all Volumes, that do not have the
EFIlabel, follow those steps:1. Right-click on a Volume and choose
Add mirroringfrom the context menu.2. In the menu that appears, choose the second drive you would like for the RAID1. Then confirm this by clicking on
Add mirroring.
- For the UEFI System Volume, please use the following steps:
1. Create an UEFI System Volume with the same size on the second drive and format it with FAT32. To do this, just right-click on the unallocated space of the second drive, select
New Simple Volumeand follow the dialog.2. Copy the UEFI System Volume data from the first drive to the second. To do that, we recommend that you boot the server to the Rescue System and connect to it via SSH:
 1
 2
 3
 4
 5
 6
 7
 8
 9
10
11
12
13
14
15
16
17
18
19
20
21
22
23
24
25
26
27
28
29
30
31
32
33
34
35
36
37
38
39
40
41
42
43
44
45
46
47
48
49
50
51
52
  -   Locate the correct partitions:

      This command will list the partitions of all drives. There, please search for two UEFI partitions on both drives which you might identify by their sizes and filesystem ([FAT32](https://en.wikipedia.org/wiki/File_Allocation_Table)) and combine the disk identifiers (`/dev/sdX`) with the correct numbers of the partitions.

      _Example:_

      ```
      parted -l
      Model: WD Enterprise P20691
      Disk /dev/sda: 2000GB
      Sector size (logical/physical): 512B/512B
      Partition Table: msdos
      Disk Flags:

      Number  Start   End     Size    Type     File system  Flags
       1      1049kB  101MB   100MB   primary  fat32
       2      102MB   2000GB  1999GB  primary  ntfs

      Model: WD Enterprise P20691
      Disk /dev/sda: 2000GB
      Sector size (logical/physical): 512B/512B
      Partition Table: msdos
      Disk Flags:

      Number  Start   End     Size    Type     File system  Flags
       1      1049kB  101MB   100MB   primary  fat32
       2      102MB   2000GB  1999GB  primary  ntfs
      ```

      In this case, the partitions are `/dev/sda1` and `/dev/sdb1`.

  -   Create mount point folders:

      ```
      mkdir /mnt/main
      mkdir /mnt/second
      ```

  -   Mount the correct UEFI System partitions. (Replace the partitions with the ones you have found):

      ```
      mount -t vfat /dev/sda1 /mnt/main -o rw,umask=0000
      mount -t vfat /dev/sdb1 /mnt/second -o rw,umask=0000
      ```

  -   Next, copy all the files from the current UEFI System partition to the new one:

      ```
      cp -ar /mnt/main/ /mnt/second/
      ```

  -   Once you're finished, boot the server back to the installed system:
Important note: The UEFI System partition can't be mirrored. The process as described above is therefore always required if you replace a drive or if you have make changes to the bootloader configuration.
Please ensure that you have added all other Volumes to the mirroring. And check that the synchronization is running, which is indicated by the reddish colored Volumes and their status information.
If you face any issues with certain Volumes, or the second Plex (which is a part of a mirrored Microsoft Volume) is not bootable, please see the official documentation.
2. References
文档时效性说明
本文为早期笔记,可能存在版本过时、命令失效、链接失效、最佳实践变化等问题。请以官方最新文档为准。
https://docs.hetzner.com/robot/dedicated-server/raid/windows-server-software-raid/