在 Hyper-V 环境安装 Gentoo
Note
本次 Gentoo 安装将会安装在 UEFI 模式启动的 Hyper-V 虚拟机上,其中 init 方式选择传统的 openrc 而非 systemd 。
1. 准备工作
1.1 下载安装介质
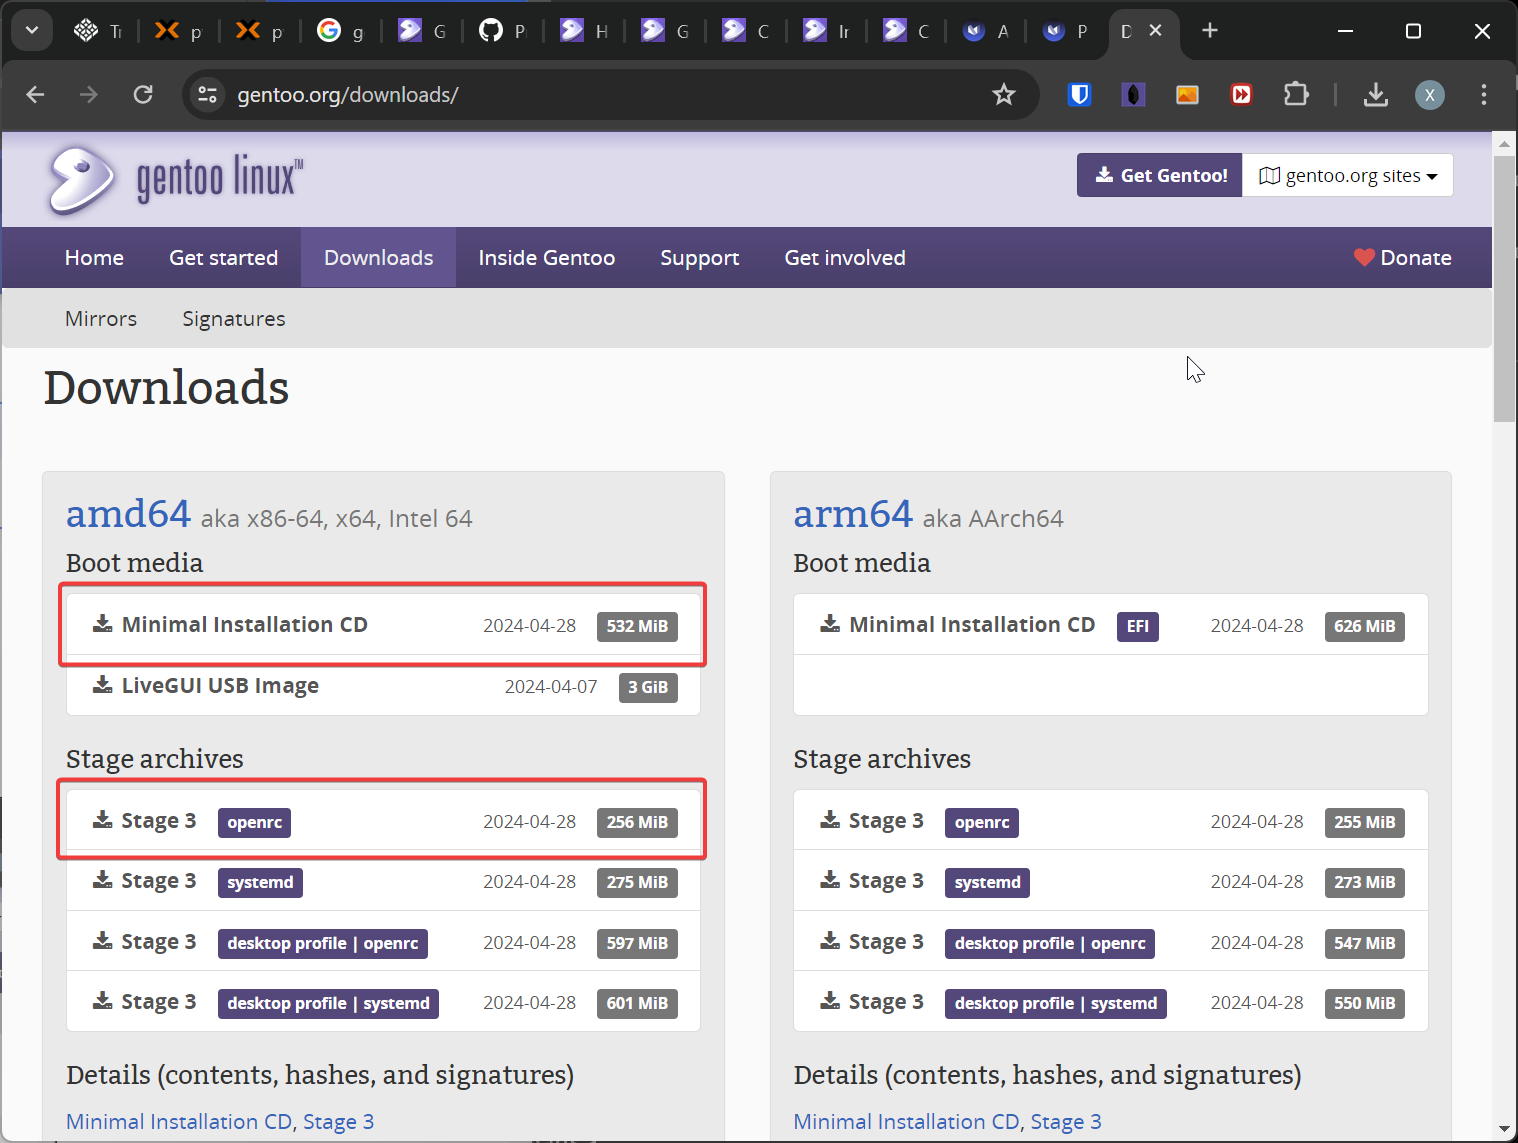
去 Gentoo 下载官网 ,下载 Boot Media 和 Stage Archive:
1.2 发放虚拟机
发放满足如下要求的虚拟机:
- 虚拟机代数:第 2 代 (UEFI 启动)
- 磁盘大小:64GB
- CD-ROM:刚刚下载的 Boot Media ISO 文件
- Secure Boot:关闭
发放完成后,从 CD-ROM 启动并引导进入系统。
1.3 连接网络并启动 SSH 服务
使用静态 IP 地址的方式配置网络,使用 ip a 命令查询到当前环境网卡名称为 eth0 ,之后使用 net-setup eth0 命令配置网络,一路回车即使用 DHCP 模式。之后使用 ifconfig 命令查看 DHCP 获得的 IP 地址。
之后使用 passwd 命令设置临时 root 密码,使用 rc-service sshd start 命令启动 SSH 服务,后续通过 SSH 远程连接来继续安装。
2. 磁盘分区格式化
使用 fdisk 对硬盘进行分区,分区表格式为 GPT ,此次使用的分区表如下:
| 分区名称 |
分区大小 |
文件系统 |
挂载点 |
| /dev/sda1 |
1G |
ext4 |
/boot |
| /dev/sda2 |
256M |
vfat |
/boot/efi |
| /dev/sda3 |
磁盘剩余所有空间 |
ext4 |
/ |
格式化磁盘分区:
| mkfs.ext4 /dev/sda1
mkfs.vfat /dev/sda2
mkfs.ext4 /dev/sda3
|
挂载文件系统:
| mkdir --parents /mnt/gentoo
mount /dev/sda3 /mnt/gentoo
mkdir --parents /mnt/gentoo/boot
mount /dev/sda1 /mnt/gentoo/boot
mkdir --parents /mnt/gentoo/boot/efi
mount /dev/sda2 /mnt/gentoo/boot/efi
|
3. 解压 stage 文件
先将 stage 文件放在家目录下,然后解压:
| cd /mnt/gentoo/
tar xpvf ~/stage3-*.tar.xz --xattrs-include='*.*' --numeric-owner
|
4. 同步时间
最好在安装前用 chronyd 命令同步下时间,避免日后下载东西报错:
5. 默认配置修改
修改 /mnt/gentoo/etc/portage/make.conf 中的以下一行:
| COMMON_FLAGS="-march=native -O2 -pipe"
|
修改后,所有软件将根据本机指令集编译。
6. 安装 base system
6.1 复制 DNS 服务器信息到新系统
| cp --dereference /etc/resolv.conf /mnt/gentoo/etc/
|
6.2 挂载文件系统
| mount --types proc /proc /mnt/gentoo/proc
mount --rbind /sys /mnt/gentoo/sys
mount --make-rslave /mnt/gentoo/sys
mount --rbind /dev /mnt/gentoo/dev
mount --make-rslave /mnt/gentoo/dev
mount --bind /run /mnt/gentoo/run
mount --make-slave /mnt/gentoo/run
|
6.3 chroot 进入新系统
挂载文件系统后, chroot 进入新系统:
| chroot /mnt/gentoo /bin/bash
|
chroot 之后需要 source 下 profile:
| source /etc/profile
export PS1="(chroot) ${PS1}"
|
6.4 配置 portage
创建配置文件:
| mkdir --parents /etc/portage/repos.conf
cp /usr/share/portage/config/repos.conf /etc/portage/repos.conf/gentoo.conf
|
为了加快下载速度,需要配置镜像,修改 /etc/portage/repos.conf/gentoo.conf :
| sync-uri = rsync://mirrors.tuna.tsinghua.edu.cn/gentoo-portage
|
在 /etc/portage/make.conf 中加入:
| GENTOO_MIRRORS="https://mirrors.tuna.tsinghua.edu.cn/gentoo"
|
更新仓库:
| emerge-webrsync
emerge --sync
|
6.5 更新所有软件包
| emerge --ask --verbose --update --deep --newuse @world
|
7. 本地化配置
7.1 设置时区
| echo "Asia/Shanghai" > /etc/timezone
emerge --config sys-libs/timezone-data
|
7.2 设置 locale
在 /etc/locale.gen 中对需要的 locale 取消注释,然后重新生成 locale :
设置默认 locale :
| Available targets for the LANG variable:
[1] C
[2] C.utf8
[3] POSIX
[4] en_US.utf8
[5] C.UTF8 *
[ ] (free form)
|
| Setting LANG to en_US.utf8 ...
Run ". /etc/profile" to update the variable in your shell.
|
重新加载 profile :
| env-update && source /etc/profile && export PS1="(chroot) ${PS1}"
|
8. 编译并安装内核
8.1 下载内核源码
| emerge --ask sys-kernel/installkernel sys-kernel/gentoo-sources
|
8.2 选择内核源码
| Available kernel symlink targets:
[1] linux-6.6.21-gentoo
|
8.3 安装 genkernel
| mkdir -p /etc/portage/package.license
echo 'sys-kernel/linux-firmware @BINARY-REDISTRIBUTABLE' > /etc/portage/package.license/linux-firmware
emerge --ask sys-kernel/genkernel
|
8.4 编译内核
使用 genkernel 生成并自动安装内核:
| genkernel --mountboot --install all --hyperv
|
9. 安装后配置
9.1 配置 fstab
编辑 /etc/fstab :
| /dev/sda1 /boot ext4 defaults 0 2
/dev/sda2 /boot/efi vfat defaults 0 0
/dev/vda3 / ext4 defaults 0 0
|
9.2 配置主机名
| echo gentoo > /etc/hostname
|
9.3 安装必要的软件
安装 dhcpcd 来为 DHCP 提供支持:
| emerge --ask net-misc/dhcpcd
rc-update add dhcpcd default
rc-service dhcpcd start
|
安装 netifrc 来管理网络:
| emerge --ask --noreplace net-misc/netifrc
|
安装 system logger 、 chrony 等基础软件:
| emerge --ask app-admin/sysklogd sys-process/cronie sys-apps/mlocate net-misc/chrony app-shells/bash-completion sys-fs/xfsprogs sys-block/io-scheduler-udev-rules
rc-update add sysklogd default
rc-update add chronyd default
|
9.4 安装 bootloader
安装 grub 软件包:
| echo 'GRUB_PLATFORMS="efi-64"' >> /etc/portage/make.conf
emerge --ask --verbose sys-boot/grub
|
Warning
安装 grub 会修改现有引导配置,请确认目标磁盘正确。
安装 grub 到硬盘头:
| grub-install --efi-directory=/boot/efi
|
生成 grub 启动项配置:
| grub-mkconfig -o /boot/grub/grub.cfg
|
9.5 设置 root 密码
安装过程中不要忘记用 passwd 命令设置密码。
9.6 配置网络
使用 DHCP 的方式配置网络,在 /etc/conf.d/net 中增加网卡配置:
配置开机启动(如果是静态地址,需要禁用 dhcpcd 防止其自动获取 169.254 网关):
| cd /etc/init.d
ln -s net.lo net.eth0
rc-update add net.eth0 default
|
9.7 配置 SSH 开机启动
| rc-update add sshd default
|
9.8 配置 SSH 允许 root 使用密码登录
修改 /etc/ssh/sshd_config :
10. 安装完成并重启
退出 chroot 环境:
卸载文件系统并重启:
| umount -l /mnt/gentoo/dev{/shm,/pts,}
umount -R /mnt/gentoo
reboot
|
11. 参考文献
https://wiki.gentoo.org/wiki/Handbook:AMD64
https://wiki.gentoo.org/wiki/QEMU/Linux_guest#Kernel
https://wiki.gentoo.org/wiki/Kernel/Configuration